How to practice Classical Guitar
Classical Guitar Practice
I stress this truth constantly: The players who practice well, play well. The players that practice like masters, play like masters. Read this chapter several times and take your time to fully understand the concepts explained because they are essential to your progress as a guitar player.
You do not need special gadgets or special talents to practice like a pro, what you need is an attitude. Be focused and keep a set of simple tools like a pencil, an eraser, a small notebook and a metronome and a tape/video recorder handy. Playing like a pro is not only about playing flawlessly but it is about a series of very important intertwined factors.
Your goal is attainable if you wish to implement the correct practicing habits. Than, consistency and perseverance, glue everything together into what is generally known as a great player.
Many of my students are stuck with different guitar methods. I say stuck because guitar methods are designed to get you stuck somewhere around the middle of the book. I still have not met any guitar student who finished a guitar method from beginning to end. The reasons are obvious, most too often the player looses interest and, eventually, tells himself: "What am I doing playing Lullabies and Christmas Carols when my aim is to play Recuerdos de la Alhambra!".
I agree with these students and that is why I want to introduce you to a concept that will definitely make playing more what you dreamed it would be and get you one step closer to your dream piece with every practice session:
How to Make Your Own Exercise
Video above: Learn how to make your own exercises - Cavatina.
Video above: Breaking challenges into smaller challenges.
The practice method is called "make your own exercise", it is not a trademark, it is not a system invented by anyone, it is simply 4 words which explain a learning process PERFECTLY. It is demanding in that you will have to write things down to keep track of what it is that you have been up to and have your practicing time very organized. I will use a practical example to illustrate the idea. The Make your own exercise approach allows you to start playing any piece, and, the best piece to play first, is not necessarily Romance or Lágrima, but the piece you like most. Nothing can be more effective in overcoming technical challenges than motivation.
Ok. The first things that the guitar player has to determine when he faces a musical technical challenge are: Is the challenge in the right hand or is it in the left hand; maybe it is a little in both.
The C9 Arpeggio in Cavatina
Some of you may recognize this famous measures, they represent the first challenge in Cavatina. We generally see it like this: "A nasty C 9 (bar chord at fret 9) played at the 9th fret, with a legato performed on the second string. All of this performed as we are trying to make one of the greatest melodies ever written stand out."
Ok. First of all let me clarify that although you will eventually play this phrase just fine, it was really designed to work on 2 guitars. The player must first spot the melody, which has to be protected from all the surrounding notes. The melody is:
What I do is take the melody line and isolate the legato and the high C# in order to master these first. What you are doing with this is reduce the problem to its minimal components which have to be mastered separately.
1) The Model
The way I overcome the challenge is by breaking it into the smallest unit of challenge possible and by making an exercise using the metronome for approximately 5 minutes. I will use this unit as a model and I will refer to it as "the model" (image below) throughout this chapter.

Frames 1 and 4 Explained
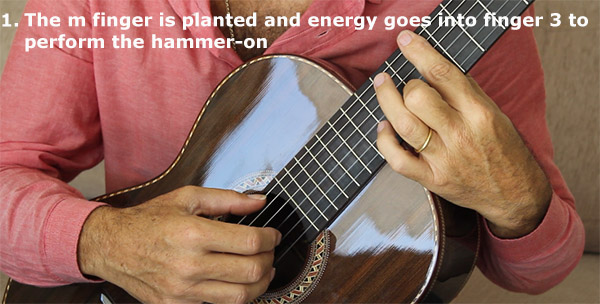
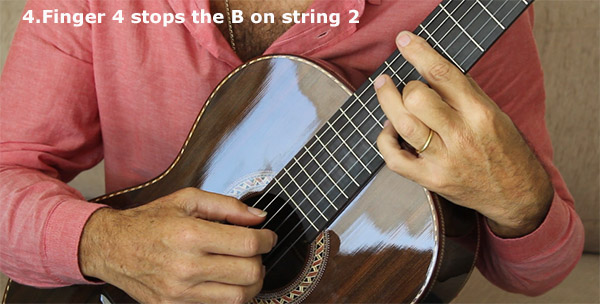
Play the 3 notes sequence above starting at fret 9 and moving backwards on the fingerboard until you reach fret 1. Put the metronome at a speed where mistakes are impossible to happen. Your goal is to play the sequence back and forth for approximately 5 minutes but it is likely that you will not be able to do it for more than 30 seconds at first without the hand becoming numb or in pain. Stop as soon as s tension mounts up, rest and try again.
If you make a mistake, STOP, rest and start again. Your goal is to be able to play the model all the way to first position flawlessly. Remember, playing the C9 model at fret 1, is like running with weights on your ankles. When you take the weights off (go back to C9), you will feel faster and lighter. As a rule of thumb, remember that whatever you play in first position is harder than the equivalent played down the fingerboard (positions 5-9). The higher set up of the action on the higher frets creates a challenge of a different kind.
Summing up, what you just did is incorporate a new model in your guitar playing lexicon. It will probably show up again in this piece and other totally different pieces that you will play in the future. This is how a professional player sees a musical challenges: The barre arpeggio at C 9 is actually made up of smaller parts that have to be mastered separately and than bonded together in what is wrongly approached as "C 9".
2) Complete the Arpeggio Sequence at C9
Once the model of the main melody has been played, you are left with the other model to deal with. You need to add the remaining notes that complete the C9 arpeggio scenario. You make a new model and practice the complete scenario moving up and down the fingerboard for approximately 3 minutes with the metronome.
The Arpeggio Sequence
This model is tiring because of the barre chord. RELAX the left hand between positions and stop playing when pain or stiffness starts building up. Guitar playing has nothing to do with the "no pain no gain" slogan from the 80s.
What you learned so far is that the 2 measures pose more than 1 challenge and that the player can easily be fooled in thinking "ok, the first thing I have to put down is a barre 9." - WRONG! The phrase can and has to be broken down into 2 parts. We learned to call each one of the parts "model" because it is a pattern that we will move up and down the fingerboard and one that we will use to stay focused on the challenge at hand.
Once the models are dominated separately, we put them together. Unless you use this approach with classical guitar playing, you will feel like you are banging your head against a wall over and over without improvement and this can be very frustrating. The key to master guitar playing is master practice. The people you see on stage have worked out so many models in their careers, that eventually, they will find the same models over and over in different pieces of music. This explains why they can make their repertoire larger and larger in a relatively short time. Eventually a new scenario appears and the master will go back to the model approach, making his own exercise, just like we did here.
You will realize that is is a new approach, a tiring one at first requiring concentration. You will only be able to apply this amount of concentration for short bursts until the whole system becomes your system of practice and, eventually, you will understand why masters do not practice more than a couple of hours a day. If you are practicing hours and hours, you are not practicing correctly. Just so that you know, when I worked with the masters, we would get stuck on a model or 2 for a whole 45 minutes lesson.
The continuation of this class is in the members area, become a member today.