Scales
Perfecting Scales
Part 1: Introduction
The practice of scales is, generally speaking, very intimately related with the "serious" practice of a musical instrument. Scales will make your sense of position on the fingerboard a lot more precise. Scales will also help you polish your translation skill on the fingerboard.
Although the approach that has most people thinking of scales is the fast series of notes produced by a "possessed musician", the truth of the matter is that scales are not really meant to increase speed, synchronicity and dexterity, but to polish sound. This is especially true with the classical guitar where sound is not produced by an artifact, like a bow on a violin or the key on a piano, but by the direct contact of the flesh and fingernail with the string.
The classical guitarist must use scales with this purpose in mind primarily or he'll be wasting precious time. Speed wise, the classical guitar is never really played fast, the great masters deliver the illusion of speed but the truth of the matter is that a mediocre piano player can play a well sounding scale twice as fast as the best classical guitar player.
Sound must be the focus in scales. Scales are a lab where the single element of music, the note, is isolated and examined and pushed to all its extremes.
Unlike piano players that work independence of the hands, the classical guitarist works on synchronizing the 2 hands. When the left hand is stopping the given note in the scale, the right hand finger is planted (touching with the tip) on the string that will produce the sound. Read more on Planting.
It is only then that the command is sent to the finger to pluck (Attack) the string. Attack is a term I first heard referring to plucking the strings of the guitar when I studied with Abel Carlevaro in Montevideo. I find the term very illustrative because it depicts very well what happens to the string when it is "attacked" by the finger. You will see me use the word constantly on mangore.com.
Depending on the precision and quality of your sound, you will be defining yourself as a "good" or "not so good" guitarist. Just like with singers, that are judged by the quality of their voice: "Oh yes, she has a beautiful voice!" - Guitarists are judged by the beauty of their sound and this is strictly related to the earlier mentioned factors (planting, attack, syncronicity of the 2 hands) and not by the price tag on their instrument.
The quality of the instrument is actually measured on how easily it allows the player do do this work and not by what amount of dbs it puts out and, in my many years with the classical guitar I have learned that it is impossible for a guitar not to sound good. It is a perfectly conceived instrument and I have played 30 bucks worth of guitar and made it sound like 3,000. Unfortunately, I have also heard very expensive instruments in mediocre players' hands sound like cheap things. It is also true that the guitar was not conceived for the classical repertoire but it is just as true that no other instrument on the planet can adapt music written for other instruments as well as the guitar does. These pieces become "adopted pieces" and often surpass in quality the original instrument version (one clear example is the music of Albéniz). And most of the great guitar repertoire is actually made of adopted pieces. This is perhaps the guitar's greatest quality, and the reason why it is the most loved instrument of them all.
Part 2: Synchronicity
Once you decided what scale(s) you want to learn, it is wise to center your energy on 2 key aspects in scales performance:
- Synchronicity between the 2 hands.
- Fast alternation between right hand fingers.
Following are 2 great exercises to achieve all these factors simultaneously. The performer must use a metronome in order to achieve smoothness. Increase the speed gradually. Do not practice this exercise if you are tired or distracted.
1) Play all the formulas.
2) Do not wait to master one formula before you pass on to the next.
3) Start with string 6 and descend all the way to string 1 and back up.
4) Play each model for at least 30 seconds. You will feel the right hand muscles warming up. That is good. When pain starts appearing, stop.
5) Put an accent on the first note of each 3-notes group.
6) Play these exercises every other day for 1 month and than stop.
Remember to be creative with technique. You can change the notes to groups of 4 sixteenth notes and move the accent at every 3, 4, 5, 6... notes.
The next great exercise to master scales is the 12 measures scale in Bach's "Chaconne in D minor".
Part 3: The Chromatic Scale
The Chromatic Scale is the mother of all scales because it allows the player to explore the complete width and length of the fingerboard. Most of the "precision work" takes place in the right hand and the left hand will only have to work through a series of presentations (the way the left hand looks with respect to the fingerboard) that are repeated relentlessly. These must be precise and must be incorporated in the playing with care or else you will be incorporating faulty techniques that will not take you very far. It is the same that happens with golfers. If they developed a swing with a tweak, they'll eventually have to stay off the golf tournaments for some time until they remove the bad habits, acquire the good ones and only then move forward. This phenomenon happens with great golfers and also with great players. Your "game" will only be as good as your technique and you will always be the hardest "audience" to satisfy.
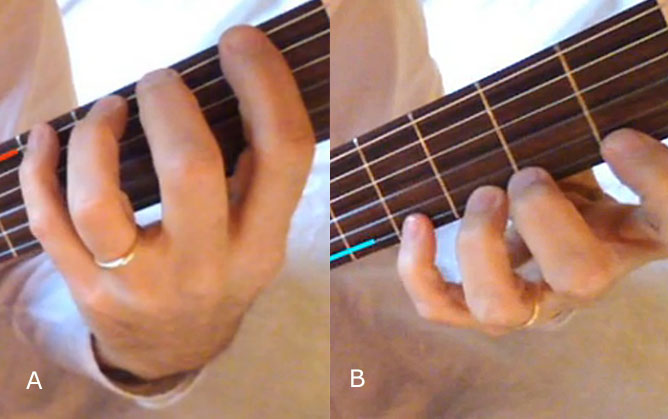
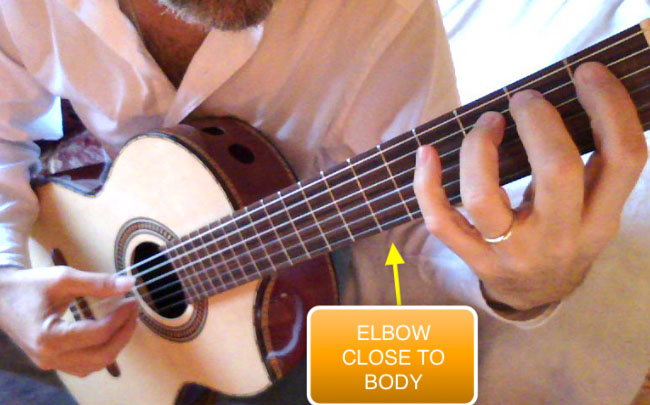
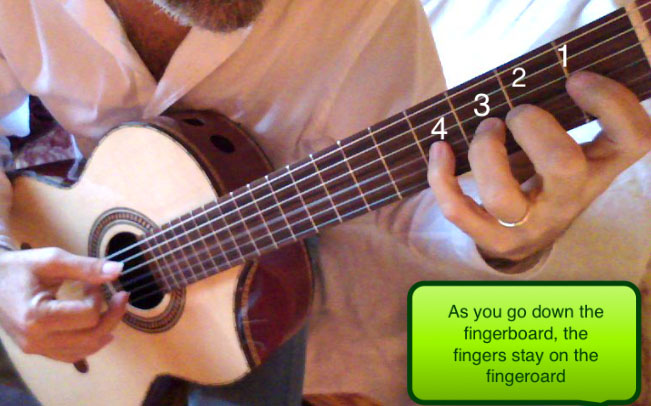
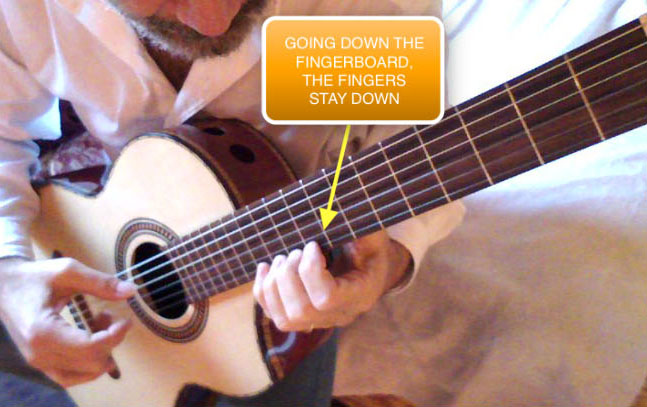
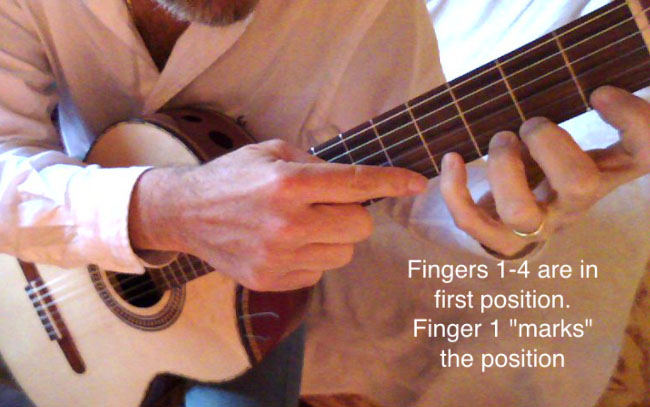
As you come down from the 6th to the 1st string, the LH fingers are "looking" at the 6 strings from the same angle. If you look at the pictures, you'll notice that the elbow is close to the side of your body when you are playing on the 6th string (image A) and further from it as you come down towards the 1st string (image B). Notice also how the wrist allows for the angle in the articulation to be just right for the correct presentation of the hand on the fingerboard (image A).
The keywords to avoid defects to enter the technique are: play very slow and always have a metronome near or do you think that Mr. Nick Winkel invented it because he had nothing better to do?
The metronome is a relentless teacher that will tell you: "This is as fast as you will play BIG SHOT!".
It can only do one thing, keep its word and not skip a beat nor alter its duration. It has been demonstrated throughout many generations that those players that use the metronome regularly, improve their playing at an average rate 4 times superior than the metronome orphan counterparts. Get one with the pendular system and one that is cranked by hand because these last 500 years and also help your eye work under a marked movement which will avoid you from becoming one of those players that has to tap a foot or move about in rhythm in order to "feel" or "see" the beat.
Part 4: Arpeggio Style Scales
I define as such those scales that are approached as if they were arpeggios. There is an active participation of the Thumb and a finger that carry just as much work load as the i & m fingers. In this type of scale, the Right Hand is kept much more steady. One piece that fits this scale format to perfection is the big scale in Agustin Barrios Mangore "La Catedral".
La Catedral, Allegro (4 fingers scale)
The scale in the Allegro Solenne from La Catedral is an excellent workout scenario because it allows for the use of all 4 right hand fingers. If the technique is used properly, the center of gravity of the right hand will not have to be moved up and down across tech strings (like the Chaconne in D minor requires you to do for instance) because you will assign all 4 fingers to the execution of the scale thus allowing the hand to behave more in an arpeggio fashion rather than a scale fashion.
In the opening measure you can use the a finger exclusively in combination with pull offs accentuating the first note of the slur in order to get is down perfectly.

Look at the video where I practice the scale from "La Catedral" using the metronome and watch closely how I use the following resources:
- All 4 right hand fingers.
- Pull offs & hammer ons.
- Repetition of the same right hand finger.
This particular scale from La Catedral is full first class raw material that will enable us to work scales in depth. You will need to get our hands really well fit. Some scenarios will be entirely new to your right and left hand. Therefore we will constantly be "making your own exercises". If the scenario is not new, then it belongs to our technique already. Technique is the accumulation of positive past experiences with a given challenge. I will give you ideas.
Get the first 4 notes from the measure:
A slide followed by a slur with 3 and 1. This may just as well be your first challenge. Think of an exercise to get the muscles fit for this 4 notes sub scale. One idea is to repeat the sequence indefinitely on the correct notes or to move the model to different positions moving gradually up and down the fingerboard.
You can move this model up to the F on fret 1 and back to the A# on fret 6 (or beyond).
The second exercise poses the following challenge: move the model up and down the 6 strings. You can then mix the two models: play up and down and across the fingerboard.
Use a on string 1, m on string 2, i on string 3, p on strings 4 - 6.
Always keep in mind that technique is a creative process, therefore, create your own variations.
Part 5: Use of the Metronome
The Metronome is one of the best allies that we guitar players can have during practice. You cannot see true progress in your playing unless you use it in all your practice sessions. The metronome helps you in becoming more precise and helps you create a stress free technique. The scale I practice with the metronome in the video is from Bach's "Chaconne in D minor". This is the toughest and probably the longest scale in the guitar repertoire. If you can find your way around it, you will pave your way through all your scales present, past and future.
It is important that you notice how the 2 hands move together across the fingerboard. In the animation below you can see that the right hand descends across the strings and then goes back up towards the bass strings in order to allow the right hand fingers to play on the corresponding strings without changing the natural curvature of the right hand fingers.
Part 6: Speed
Speed must be introduce in practice using the metronome and never at the cost of sacrificing the quality of your sound. Keep the speed of the metronome constant and increase the number of notes in each beat. Start at 100 BPM (Beats Per Minute) and increase gradually. Shift the accent on the notes as you practice the scales. Put an accent on the first of 2, then on the first of 3, and finally on the first of 4 and 5. Speed must be introduce in practice using the metronome and never at the cost of sacrificing the quality of your sound. Keep the speed of the metronome constant and increase the number of notes in each beat. Start at 100 BPM (Beats Per Minute) and increase gradually. Shift the accent on the notes as you practice the scales. Put an accent on the first of 2, then on the first of 3, and finally on the first of 4 and 5. The key here is to stay in control and not sacrifice sound quality in exchange for speed. Always remember that nothing in music is more important than the beauty of your sound and that every other aspect of technique ought to take the back seat.
3-Fingers Scale
3-Fingers Scale is the way scales evolve naturally because they enable you to play using one single fist like motion to play 3 notes. Most times, the piece you work will require that you use the best combination of fingers possible and whenever 3 or more notes in a scale are played on the same string, it calls in for a 3-fingers approach. Many great players used the 3-fingers scale approach but none mastered it to the extent that Maestro Narciso Yepes did. Below you can hear Yepes play the Amazing scale in Bach Chaconne where he uses the technique.The flow that Yepes achieves is simply astounding and I have never heard anyone else render the piece as majestically since. In one of the pictures that appear during the clip below, I am having lesson with Yepes in his Las Rosas home. That was the first time I heard the piece and it was love at first sight. The maestro explained to me how he made extensive use of the 3 fingers technique to achieve the stunning flow.
Video
Animation
The continuation of this class is in the members area, become a member today.