Anonim, "Romance" (TAB)
Transcription and Fingering: Renato Bellucci
Our first concert piece: Romance. A piece made famous by the Spanish guitarist Narciso Yepes who recorded it to become the soundtrack of a french movie "Forbidden games". It was the first great guitar classic launched by a movie.. the last one I can think of is Stanley Myer's Cavatina.
To play Romance, we will first focus on the right hand (the hand responsible for sound fabrication, literally). The right hand (from now on RH) will be playing an arpeggio.
Arpeggio = Playing the notes of a chord successively rather than simultaneously.
Use a guitar tuner to tune your guitar. You can always use your ears as backup.
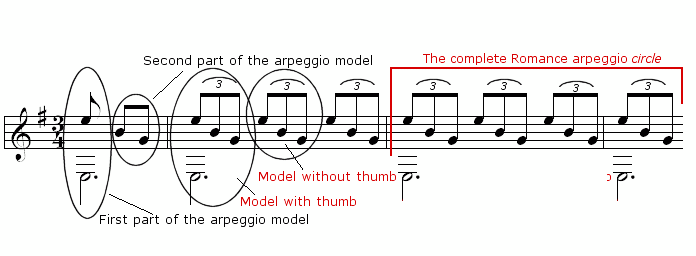
Work on the model and get your RH oiled - To oil: Verb, to put oil into a machine to make it work more smoothly-. Do not play faster than necessary. You are playing too fast if you make mistakes. Nobody is hurrying you. Focus on sound and simply make sure that every string is projecting the sound you like. Practice this model 3 minutes at a time. Then rest and repeat for 3 more minutes. Do this a total of 3 times on your first practice session.
Key Signature Explained
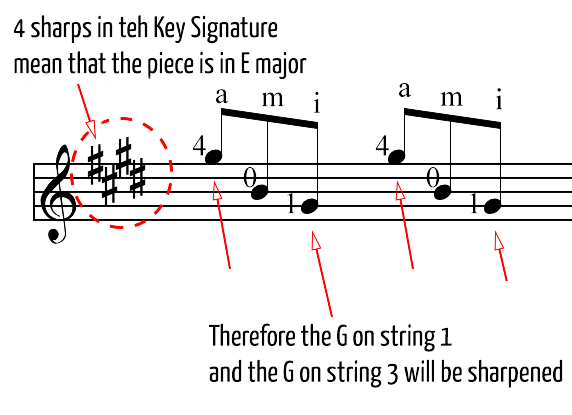
Right next to the G clef at the beginning of the piece (image above), you sometimes have what are called "accidents" (sharps, flats). These would be the equivalent of the black keys on a piano. They indicate that the note that the sharp in this case points to, the F in Romance, and all the Fs throughout the first part of Romance will be sharpened. In other words, unless indicated otherwise, every time you find an F in the first part of Romance you play an F#. This is done so in order to tell the player what tonality (the musical equivalent of color tone to a painter) the piece is written in and to avoid cluttering the score with too many markings... If the sharp is an isolated occurrence, it will only affect the note it points to in the measure where it appears but then leaves the note unaltered in the next measure
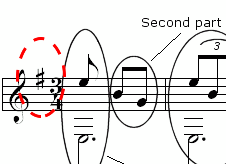
The image above shows the key signature of the second part of Romance. This indicates that throughout the second part, all Fs, Cs, Gs and Ds will be sharpened unless otherwise indicated.
Staff and Video 1
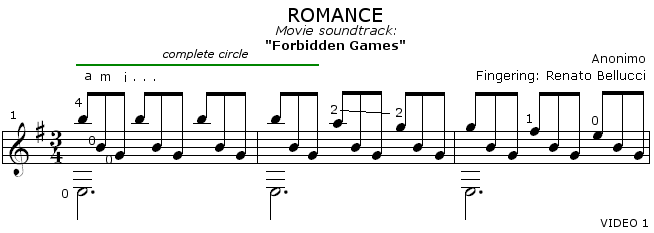
Finger 2 moves from the A to the G (portamento, marked by the line bonding the 2 notes). The key here is to achieve the position change with the left arm. Watch the video closely and notice how the hand presentation over the strings remains the same while the position on the fingerboard changes. Forget the rest stroke! It is primitive. Rest stroke is a special effect, not a way to play 50% of the notes in a piece. The way you make a note stand out is by means of fijación. The main melody in Romance is the highest notes of the arpeggio. Use different degrees of fijación to bring the melody out. The exercise and all its combination must be a part of your daily practice.
In the video I show in color when the bass string is played (every 3 beats)
The underlined words, link to the technique pages explaining these concepts.
Video 1
Staff and Video 2
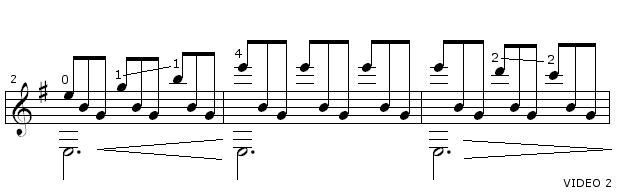
1-The symbol that looks like s long letter V on its side between the low Es, is a musical symbol that indicates that the volume (ie: the intensity of your right hand plucking) must steadily increase or dicrease. 2-The high E on fret 12 of string 1 is the highest point of Romance in part 1. This high E is one of the most played notes on the classical guitar because it belongs to the tonality of E and this is the tonality that makes the guitar shine at its best. The E must be played louder and a slight vibrato will add beauty and sweetness. Look closely at the movements of the LH arm in the video. The arpeggio can be played either slow or very fast. Both interpretation have beauty of their own. It is up to the performer to decide on tempo.
Video 2
Staff and Video 3
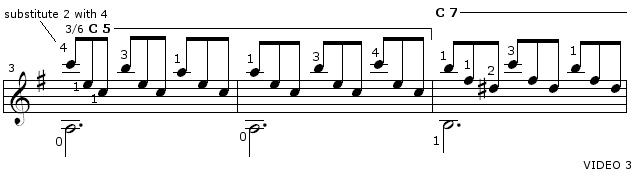
Romance Barre in depth study:
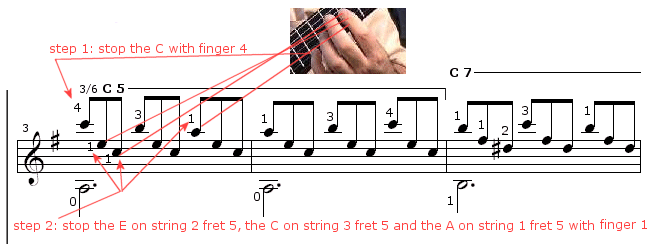
1- Put finger 4 down on the C on string 1 fret #8.
2- As you hold
down this note, press with the 2 last phalanxes of your left hand index
finger (finger 1) strings 1, 2 and 3 at the 5th fret simultaneously.
Whenever a finger stops more than 1 note on the same fret with the same
left hand finger, you have a barre. Barres are the toughest technical
challenge for every player, so, welcome to the club! :-) The trick here
is in the approach:
a) Work the first 2 measure of staff 3
separately. As if it were an exercise. Since you will be squeezing like
crazy at first, stop every few seconds to allow the pain to dissipate.
b)
The stretch between finger 4 stopping the C on string 1 and the barre
on string 5 is where the problem stands. Bring the wrist forward to
achieve greater ease of stretch. Remember that you are commanding little
muscles that have never received this type of elaborate scenarios
before. Patience and determination must kick in now full throttle.
Eventually, you will see that it is not a matter of squeeze but of
correct usage of the playing apparatus.
c) Do not attempt the
larger Barre 7 until you got these 2 measures perfect. Meanwhile, so as
to get the piece going, work measure 2 of staff 4 to the end of part 1.
To be continued.
For
the 3/6 barre 5, use the outer side of finger 1. As you make the
transition from barre (also known as capo) 5 to barre 7, allow for
relaxation in the LH.
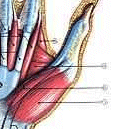
The muscle between the thumb and the index (image above) becomes tired and in pain real soon when no oxygen is supplied because of the squeeze to perform barre. Therefore, allow for minimum squeeze and one that lasts for the required time only. Learn how to relax your LH every chance you can. The transition between the 2 barres must be used to relax. Finger 2 stays in place to play the repeating D#, therefore, when you are playing barre 7, make space for finger 3 by pushing the arm forward. Watch the video closely. Do not think only fingers when you play but fingers-hand-wrist-forearm-arm and shoulder.
Video 3
Staff and Video 4
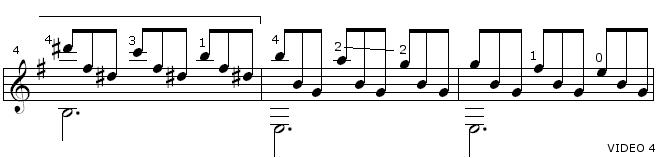
Use your whole playing apparatus to make the stretch and reach the eluding D# on fret 11. As soon as the barre is over, take a deep breath and play the closing section of part 1. In the videos I mark the bass when it is played in the arpeggio sequence.
Video 4
Staff and Video 5
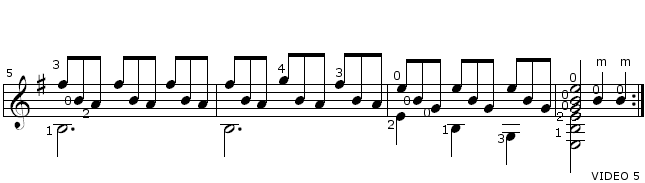
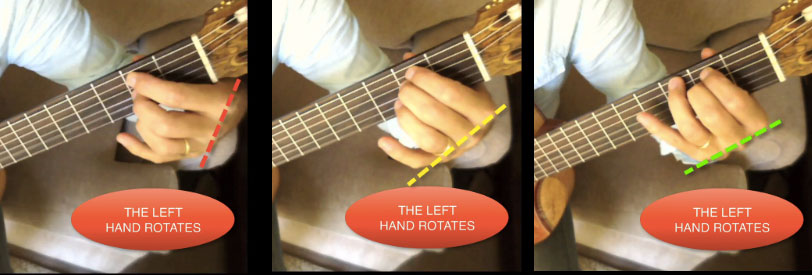
Notice how the line of knuckles rotates as the fingers are presented on the fingerboard to play the transition into the Em chord/arpeggio.
As the arpeggio comes to an end, hold finger 1 throughout. You will be using it to the very end of the part. Do the same with finger 2 once it is down. The red dotted line indicates the line of the knuckles which is almost perpendicular to the strings. This is typical of those instances when more than one finger is occupying the same fret. Notice how I change the angle of the line of knuckles (dotted line is yellow and then green) as the hand rotates to present different fingers on the fingerboard.
Video 5
Revision: Asunción, February 14, 2013


